Destiny 2 – King’s Fall Raid: Basilica Encounter Guide
The first true encounter of the King’s Fall raid is the Annihilator Totems of the Basilica.
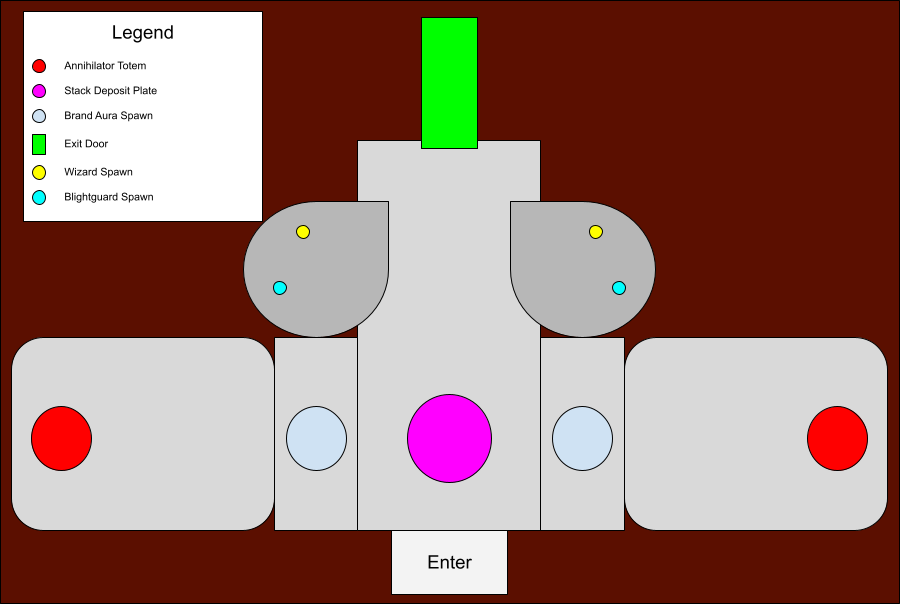
The objective of this encounter is to open the door to the next encounter by depositing stacks into a central plate.
All the while there are two Annihilator Totems in two side rooms which will wipe the entire team if they are not stood on by anyone for a few seconds.
With The Final Shape now live in Destiny 2, there’s a new Prismatic Subclass to explore. Dive into the best Prismatic builds for Hunters, Warlocks, and Titans for an edge
The Mechanics

3 players should be assigned to each side. Within a group of 3 players, these 3 will continuously swap spots on the Annihilator Totem while holding the Brand Aura.
These 3 players will order themselves, the first will grab the Brand Aura Spawn, the next will kill the Wizardand Blightguardthat spawn on their side’s balcony, and the third will deposit their Deathsinger’s Power Stacks by standing on the central Stack Deposit Plate.
We’ll go through the cycle from the perspective of the first player. Once this player grabs the Brand Aura they will have a Brand Buff that lasts for 30 seconds.
During these 30 seconds, this player will stand on the Annihilator Totem because if no one is standing on it for roughly 5 seconds it will wipe the entire team, and they kill enemies.
For each enemy, this person kills while having the Brand Buff they will get Deathsinger’s Power Stacks. The second player will come along and reprieve player 1 of their spot on the Annihilator Totem (we will go over how in a second).
Once this player is reprieved they will then run to the center and deposit the Deathsinger’s Power Stacks by standing on the Stack Deposit Plate in the center of the room.
Once these stacks are deposited this player will jump up to their side’s balcony and kill the Wizard, then the Blightguard, and lastly pick up the Brand Claimer that the Blightguard drops. Once this player picks up the Brand Claimer they can run to the Annihilator Totem and take the Brand Buff from the player who is standing on the totem. Now, this player has completed the cycle and will repeat it as many times as needed.
This encounter is ultimately finished once the team deposits enough Deathsinger’s Power Stacks to open the Exit Door.
To summarize the order of actions a player will perform are (this list will start at player 2):
- Kill the Wizardand Blightguard
- Pick up the Brand Claimer
- Run to the Annihilator Totem
- Take the Brand Buff from the player on the totem
- Kill enemies while standing on the totem to build stacks of Deathsinger’s Power
- Have another player take the Brand Buff from you
- Run to the center Stack Deposit Plate
- Deposit all stacks of Deathsinger’s Power by standing on the central plate
- Repeat
Tips and Tricks
- If the player with the Brand Buff dies, a new Brand buff can be acquired from the Brand Aura Spawn. So don’t give up if this player dies. Just make sure someone gets on the Annihilator Totem before it wipes the team.
- There are symbols to each side of the Exit Door that light up as you deposit Deathsinger’s Power stacks which track your team’s progress through the encounter.
- Each time the Brand Buff is swapped a yellow bar enemy will spawn in the side rooms with the Annihilator Totems. This is a strong enemy that will deal a lot of damage.
- You get a stack of Deathsinger’s Power for each kill you get with the Brand Buff. If you do not have this buff leave weak enemies like thralls alive so the player with the Brand Buff can get easy kills for stacks.
Loadouts
The first thing you should build your loadout around is that this encounter contains an Unstoppable Champion. In season 18 both Shotguns and Pulse Rifles are able to have unstoppable rounds and are both very good for this encounter.
A shotgun is a great option for dealing with a Wizard and Knight that will have to be killed up close and quickly.
A pulse or scout rifle are good options for standing on the Annihilator Plates while collecting stacks of Deathsinger’s Power. And any heavy slot which can clear out yellow bar Knights or Taken Minotaurs is best.
Xenophage is actually a great option as it can 1 shot a yellow bar Knight or Taken Minotaur with any damage buff active, has more than enough ammo, and can be used to quickly kill the Unstoppable Ogre, Blightguard, or Wizard if needed.
If you do not have Xenophage another heavy machine gun works as well. Rocket Launchers do kill these enemies quickly, but you can easily run out of ammo, so machine guns are recommended over rockets.
Here is a list of recommended options
- Primary:
- Pulse Rifle with unstoppable rounds
- Any mid to long range primary to build stacks
- Secondary
- Shotgun with unstoppable rounds
- Grenade Launcher to quickly kill the Wizard and Blightguard
Sniper to snipe the yellow bar enemies
- Power
- Xenophage
- Heavy Machine Gun
- Rocket Launcher if you really don’t like Machine Guns
Loot Table


- Doom of Chelchis
- Void Scout Rifle
- Quillim’s Terminus
- Stasis Machine Gun
- Chest Armor
- Leg Armor
- Class Item
Thanks for reading! Check out our other Destiny 2 raid and dungeon guides.

